
There are Several Ways to Get SketchUp
SketchUp has changed its offerings several times over the years. The descriptions given here were current as of the time of this writing.
Paid Versions
- SketchUp Go is for use on a web browser. It is not a desktop app, so it's somewhat limited in my opinion.
- SketchUp Pro is for use on your desktop, a web browser or iPad. I prefer this version because I can run it on my desktop, which is much more convenient in my opinion.
- SketchUp Studio is for use with Windows only. It has advanced features and is significantly more expensive than SketchUp Pro. It's probably best suited for the professional designer with an unrestricted budget.
All of these versions are described and available here:
https://sketchup.trimble.com/en/plans-and-pricing
Free Version
- SketchUp Free runs in a browser.
The Free version is described and available here, with 10GB of cloud storage:
https://sketchup.trimble.com/en/plans-and-pricing/sketchup-free
Free SketchUp Viewer
SketchUp Viewer is a free app available from Gizmodo. (It was available from Trimble/SketchUp until April 22, 2025.) The Viewer will allow you to view a SketchUp model the same way you can from inside any version of SketchUp. You can change your position and the type of view. You won't be able to edit and save the model, but you can print the model and use many of the other features of SketchUp:
https://gizmodo.com/download/sketchup-viewer
Introduction to SketchUp
Using SketchUp for Woodworking
SketchUp can become an indispensable tool when your woodworking expands beyond the simplest projects. It makes the design clear so that you can tell if the design makes sense—or if it even looks good—before you build it. It keeps track of dimensions. It can show you when parts don’t fit correctly.
SketchUp has two built-in templates dedicated to woodworking. One template uses inches. The other uses millimeters. Just tell SketchUp what you want to use the first time you use it and you’re all set. You can change your choice at any time.
SketchUp Isn’t Hard to Use!
Learning to use SketchUp might seem daunting at first. After all, it looks very complicated when you open it for the first time. Don’t be fooled! It will quickly begin to make sense once you’ve had some of the features explained to you. This page points you to multiple free sites that explain how to use SketchUp.
Download, Install, and Start SketchUp
Downloading SketchUp
Get SketchUp by selecting one of the paid options cited above.
Much of the information that follows on this page applies only to the paid desktop versions of SketchUp. You can skip down to more information about the Free web version if you're strictly interested in using that version.
Installing SketchUp
Once you’ve downloaded the installation file, double-click to install it. It should put two or more icons on your desktop. We will work only with the SketchUp icon.
Starting SketchUp for the First Time
- Double-click the SketchUp icon to start it
- Sign in to activate your trial or subscription the first time you try to open SketchUp
- A Welcome window will appear with a short list of template icons
- Click on "More templates" in the upper-right corner
- Scroll down in the new list to find Woodworking – Inches or Woodworking – Millimeters
- Click the little circle on your preference. This will assign your favorite.
- Click on the template image to open SketchUp
Let's Begin the Steps Needed to Make SketchUp Easy to Use
If you’ve never used SketchUp before, this is the place where things might begin to seem overwhelming. Not to worry! Just follow along as described below.
Setting Up SketchUp
I'm going to explain how I like SketchUp to be set up. You might discover that you have different preferences. But start with what I explain here. This procedure will begin your exposure to the SketchUp environment. And, it will arm you with the ability to select different preferences if you choose to do that later.
- Click on the Window menu.
- Hover your mouse over Default Tray.
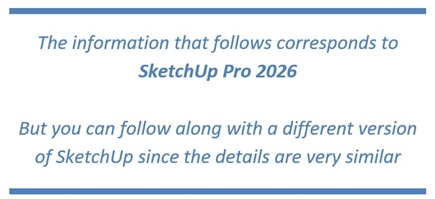
- Make sure that only these items are selected:
- Entity Info
- Materials
- Components
- Styles
- Tags
- Scenes
- Soften edges
You should now see these items on the right side of the SketchUp window:
If the items are not in the order shown, click and drag them up or down until they’re in this order.
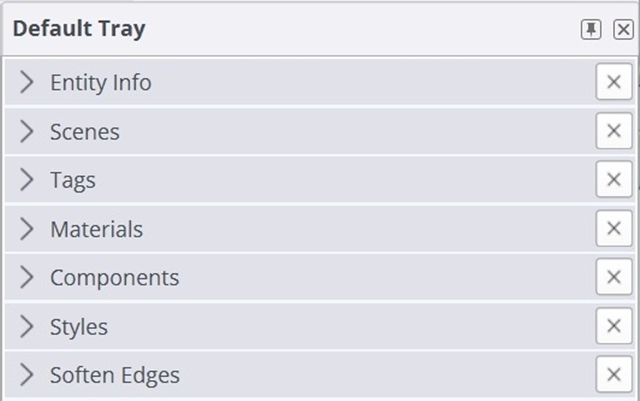
- Click on the View menu and be sure only these items are selected:
- Click on the View menu again.
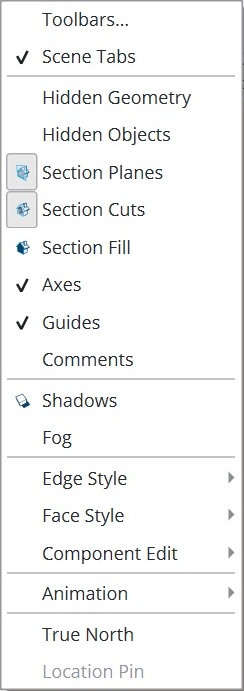
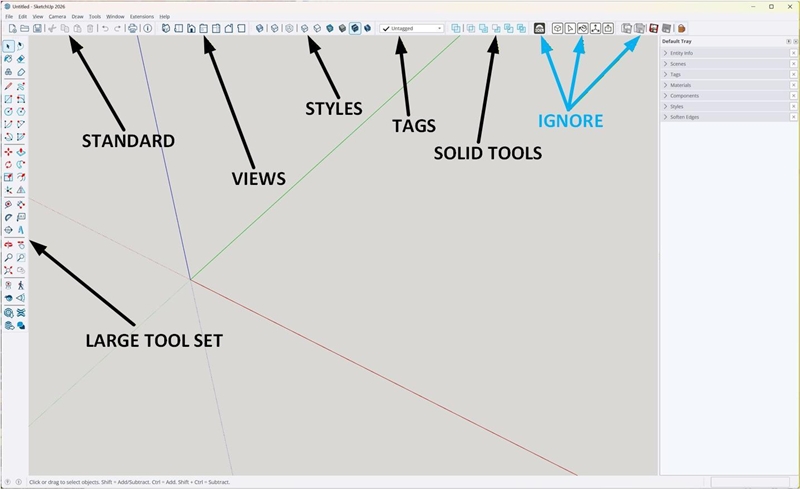
- Click on Toolbars… and be sure only these checked items are selected. (IGNORE OpenCutList, OpenCutList - Tools, and Save to olde SketchUp Version, ©Dezmo unless you have added those extensions):
- Click Close.
- Be sure the toolbars are arranged as shown here. You can simply drag the drag bar of each toolbar to move it into position as shown here:
Finally, SketchUp has many built-in keyboard shortcuts. They’re great time savers that you will want to use. But you’ll be glad to have 6 additional keyboard shortcuts. Here’s how to set them up.
- Click the Window menu and select Preferences.
- Select Shortcuts in the left window.
- Scroll down the Function window and select Edit/Delete Guides.
- Enter “N” (without the quotes) into the Add Shortcut window and then click “+” next to that window.
- Scroll down the Function window and select Edit/Hide.
- Enter “X” (without the quotes) into the Add Shortcut window and then click “+” next to that window. ("H" can't be used for "Hide" since it's assigned to "Pan".)
- Scroll down the Function window and select Edit/Unhide/All.
- Enter “U” (without the quotes) into the Add Shortcut window and then click “+” next to that window.
- Select the next item down, Edit/Unhide/Last.
- Enter "V" (without the quotes) into the Add Shortcut window and then click "+" next to that window.
- Scroll down the Function window and select Tools/Dimensions.
- Enter “D” (without the quotes) into the Add Shortcut window and then click “+” next to that window.
- Scroll down the Function window and select View/Animation/Update Scene.
- Click in the Add Shortcut window and press the F3 key. Then click "+" next to that window.
- Click OK to close the Preferences window.
Steps 11-12 arm you with the ability to delete all the guides. The shortcut lets you delete the guides without opening the Edit menu to do it.
Steps 13-14 arm you with the ability to hide an object by simply clicking on it and then pressing the X key. The shortcut lets you hide objects without opening the Edit menu to do it.
Steps 15-16 arm you with the ability unhide all hidden items by simply pressing the U key. The shortcut lets you unhide all objects without opening the Edit menu to do it.
Steps 17-18 arm you with the ability unhide the last hidden item (that is, not all the hidden items) by simply pressing the V key. The shortcut lets you unhide the last hidden object without opening the Edit menu to do it.
Steps 19-20 arm you with the ability to enable dimensioning by simply pressing the D key. You can avoid clicking on the Dimension icon in the Large Tool Set.
Finally, steps 21-22 arm you with the ability to update a Scene with one simple key-press (F3) and avoid the need to click the Update Scene(s) button in the Scenes tray and then click the Update button in the Scene Update window. (If you're new to SketchUp, please know that Scenes are addressed in some of the links that follow below.)
These shortcuts might not make much sense right now but TRY TO REMEMBER THESE SHORTCUTS. Write them down if necessary. Use them whenever possible to avoid going to a menu. They can make your SketchUp experience much simpler and much more enjoyable.
Complete List of All Keyboard Shortcuts
This is the list of ALL keyboard shortcuts. Each of the 6 additional keyboard shortcuts that you added using the above procedure is shown in brackets: [•]. You should copy this list and keep it handy to facilitate your design editing.
- Arc
- Paint Bucket
- Circle
- [Tools/Dimensions]
- Eraser
- Offset
- Edit/Make Component
- Pan
- Line
- Move
- [Edit/Delete Guides]
- Orbit
- Push-Pull
- Rotate
- Rectangle
- Tape Measure
- [Edit/Unhide All]
- [Edit/Unhide Last]
- [Edit/Hide]
- Zoom
- SPACE BAR: "Select" arrow
- F3: [View/Animation/Update Scene]
Ready to Go!
You are now ready to begin using SketchUp. If you find out later that you don’t like my preferred setup, the information given above should have provided you with enough knowledge to do things differently.
Starting to Use SketchUp
So how is SketchUp used? The links in the next section provide a broad spectrum of how-to advice for beginners.
You might like some presenters more than others, so pick and choose, and mix and match.
Beware that you will encounter references to SketchUp Make 2017. That was a free version that is no longer available.
The more you use SketchUp, the more comfortable you will feel using it. So, dive right in and begin using SketchUp. Then, when you think you're ready, try your hand at making your own designs.
There is a lot more help and advice on YouTube, so be sure always to check there. Have fun!
Use YouTube to Learn to use SketchUp Like an Expert
These are some links that you might find helpful. For beginners, you might try this excellent series from The SketchUp Essentials:
SketchUp Woodworking Tutorial for Beginners - Part 1
https://youtu.be/u80grW1zjOw
SketchUp Woodworking Tutorial for Beginners Part 2
https://youtu.be/xJdpbmUnw_Y
Steve Ramsey
Steve Ramsey makes YouTube videos primarily for beginning woodworkers. He has a video for SketchUp beginners that takes you from downloading SketchUp through building a project. It's an excellent introduction.
https://youtu.be/r2K6gmcc_jA
April Wilkerson
April Wilkerson is a clever, inventive, self-taught woodworker who has published many interesting YouTube woodworking videos. She has recently published a pair of videos aimed at the most basic SketchUp beginner. It's a good way to learn first things first. Take a look:
First Video: The Very Basics of Using SketchUp
https://youtu.be/rjSE28T3u78
Second Video: Familiarize Yourself with SketchUp by Drawing a Simple Table and a Simple Cabinet
https://youtu.be/vNf_YiBC_g0
Jay Bates
Jay Bates is an accomplished woodworker who can be found on many YouTube woodworking videos. He sometimes creates videos that show his use of SketchUp. He talks a little fast but he does real things with his SketchUp designs, so what he does is of practical use. If you feel that you’re getting past the beginner stage, take a look at some of his videos:
Here’s a beginning SketchUp video from Jay Bates:
Familiarize Yourself With SketchUp
https://youtu.be/h1pMe_fXdoM
A simple table design by Jay Bates:
Notice his clever but simple techniques. He makes things even simpler by stressing “never draw what you can copy.” He can talk fast, so pay attention. There’s a lot of useful information in this single video:
SketchUp - Sofa Table With Hidden Storage
https://youtu.be/LAVZZlw4_Uo
A simple but visually appealing set of shelves by Jay Bates:
He adds little touches to turn an ordinary set of shelves into shelves that are simple, strong, and visually appealing. As he often does, through the course of this SketchUp design example, he offers quick suggestions on how to speed up the SketchUp design process. But he can talk fast, so you'll have to pay close attention. There's a lot to be learned from this video:
SketchUp - Proud Halflap Shelving System
https://youtu.be/MAZurkPip4A?si=Tj5Zfb9XQCEoPurF
Here's a whole lot of SketchUp information from Jay Bates' website:
Jay provides a lot of general information here as well as links to his many YouTube SketchUp videos. He describes and uses only one custom keyboard shortcut (for Dimension) and also provides a list of his favorite built-in keyboard shortcuts. Note that 6 custom keyboard shortcuts were described above, so Jay's list of shortcuts might not be a complete reference for you.
https://jayscustomcreations.com/sketchup/
Matthias Wandel
Matthias Wandel is a very clever woodworker who has prepared a series of SketchUp YouTube tutorials for beginners. Take a look at this YouTube page with a list of those tutorials:
https://youtu.be/BKIeUxofprs
Robert W. Lang
Robert W. Lang used to be the Executive Editor of Popular Woodworking Magazine. He produced a very complete series of SketchUp tutorials. Everyone can benefit from viewing these.
Part 1: Getting Started
1-4: https://youtu.be/k4AgIgK0u_o
5-7: https://youtu.be/VDqzAfQm-bA
8-10: https://youtu.be/DiVeK5QnleA
11-12: https://youtu.be/mmycQeDtVZU
Part 2: Advanced Techniques
1-3: https://youtu.be/XCWYGNDClv4
4-7: https://youtu.be/ic9zOe1gTtg
8-11: https://youtu.be/7eQhrU1O1Ks
12-13:
https://youtu.be/nJUgTiQz9b4
Advanced SketchUp Joinery Techniques from The SketchUp Essentials
The techniques discussed in these links are best suited to any woodworker who is already familiar with SketchUp and who just wants to polish his skills. Basic instructions from The SketchUp Essentials can be found at the beginning of this section. All the links cited here are from a single video.
You'll probably want to get your feet wet with the Free web version of SketchUp. It's an opportunity to use SketchUp and decide if you like it enough to invest in a paid version. Or, you might be perfectly happy to stay with the Free version. Either way, the links below will introduce you to the web features of SketchUp.
Here is a very good 2-part introduction to the Free web version of SketchUp. It's presented by Justin Geis who hosts TheSketchUpEssentials on YouTube. He's a SketchUp expert who gives very clear, easy-to-follow instructions.
- Accessing SketchUp and learning the basics. https://youtu.be/vFVwPnDxNY4
- Creating your first drawing. https://youtu.be/vXMQomOKeBU
This is a 7-part introduction by someone who provides a very complete introduction to using the Free web version of SketchUp.
- Absolute basics. There is a discussion of the versions of SketchUp, and then the host spends his time on the Free web version of SketchUp. https://youtu.be/s-6dEbIuwB0
- Descriptions of the online user interface. He uses millimeters but he makes it clear how you can choose to use inches. https://youtu.be/NuQVSxpjTdE
- Making the basic carcass of a Shaker table. https://youtu.be/-LjT6QG1UVw
- Make the joinery for the carcass that was drawn in Part 3, above. https://youtu.be/oWKMssE3CK0
- Make a drawer for the table that was drawn in Parts 3 & 4, above. https://youtu.be/1kVHMbKPjFU
- Add color and details to the table of Parts 3-5, above. https://youtu.be/IqAK1X299dE
- Dimensioning, exporting, and creating scenes. https://youtu.be/dVXwhFaqMEw
Look for other resources on YouTube for beginners and for the web version.
Conclusion
This page provides a foundation for getting, installing, setting up, and using SketchUp in your woodworking projects. There is a lot of other information and tutorials available on the internet. Be sure to search the internet and YouTube for more SketchUp hints and techniques.
Good luck, and keep on using SketchUp!