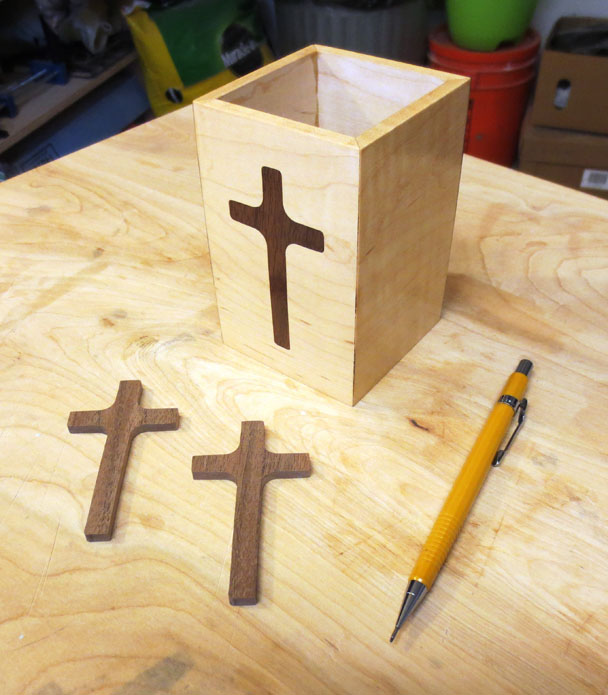
Here you can learn how to make a router template for inlay. The picture shows a pencil holder made using curly maple with a Christian cross inlay made from walnut. The inlay makes an otherwise plain box much more interesting. Notice that the walnut crosses are about 1/8" thick but the inlay is both flush with the surface of the maple and a perfect fit. People will wonder how you did it. This page tells you how.
Easy Inlays and Some Limitations of Router Inlays
A router makes the creation of inlays easy, but it has some limitations that you should know about. The items described below are visible in the picture.
- Inside corners are rounded. Notice the rounded inside corners of the cross.
- Outside corners of the inlay "positive" (the part being inserted; that is, the walnut crosses in the picture) are square. But the equivalent corners in the inlay "negative" (the part that accepts the insert; that is, the curly maple in the picture) have a small radius. So the outside corners of an inlay positive must be slightly rounded by hand so that they will fit into the inlay negative.
The Details of Making an Inlay Template from a Model
The Whiteside 9500 Inlay Kit
All the pictures, drawings, and descriptions on this page are based on the Whiteside 9500 Solid Brass Inlay Kit. It's available from Amazon.com.
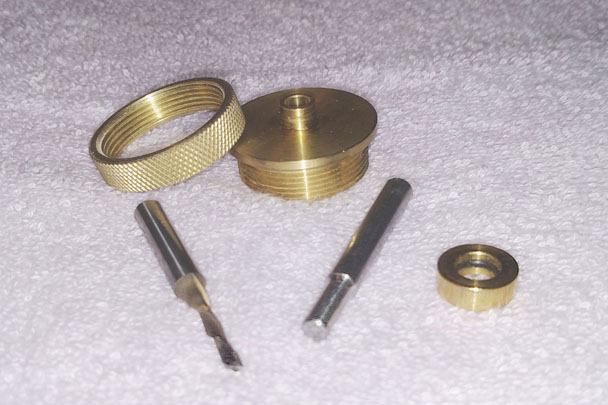
The kit comes with a threaded brass template guide, brass lock nut, removable brass outer collar, special centering pin, and carbide 1/8" down-cutting straight bit. It's designed to use 1/4" material as the template, which will be discussed in more detail below.
Set Up the Router
- You must use a plunge router. The router's base plate must be able to accept the threaded brass template guide and brass lock nut.
- Install the threaded brass template guide and brass lock nut onto the router's base plate.
- Install the special centering pin in the router's collet and adjust the router's base plate so that the template guide is centered exactly around the centering pin.
- Remove the centering pin and install the 1/8" down-cutting bit in the router's collet. Be sure that the router is set up so that you can make maximum use of the cutting portion of the cutting bit.
- Be sure the removable outer collar has been removed.
Let's Start with a Simple Pattern
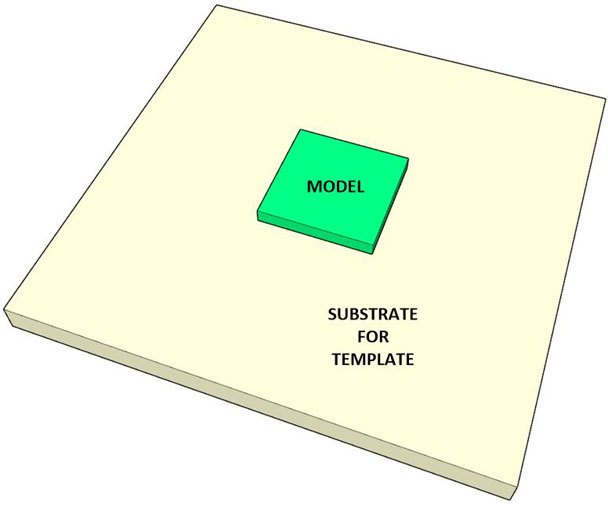
Since the purpose of this presentation is to provide a simple explanation, we can begin with a very simple pattern: a square. You've found a square that you like and you want to use it as the model for your inlay. The square in the example below is 1" x 1". Follow these steps:
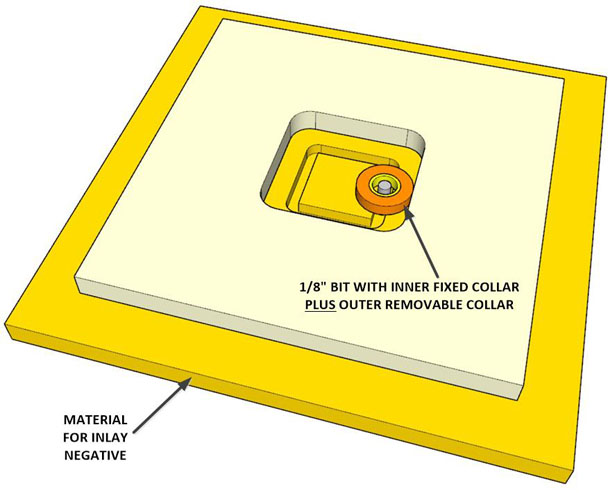
- Use double-sided tape to secure the model of your square to the top of a piece of 1/4" MDF (medium-density fiberboard) that will become your template. Be sure that the model is thick enough so that the fixed inner collar of the inlay kit cannot touch the MDF below it when the router's base plate rests on the model.
- Use double-sided tape to secure the MDF to a stable sacrificial surface. (The router bit will pass completely through the MDF and cut into the surface below.) Be sure that the double-sided tape is carefully located to secure the MDF so that it won't move during the routing operation. Also be sure that a piece of double-sided tape is located on the bottom of the MDF immediately below the model square. That material will be cut away and you don't want it to move around once it's cut free.
Look at the image below for the basic setup.
- Adjust the router bit cutting depth so that the bit will cut just past the bottom of the MDF in the above picture when the router's base plate is resting on the model square.
- Retract the bit.
- Rest the router's base plate on the model square in the above image. (This is awkward using such a small piece of material as the model, but the purpose of this explanation is simply to demonstrate how the process is accomplished. Normally the beginning model would have a larger surface area or would not be used at all, as will be explained below.)
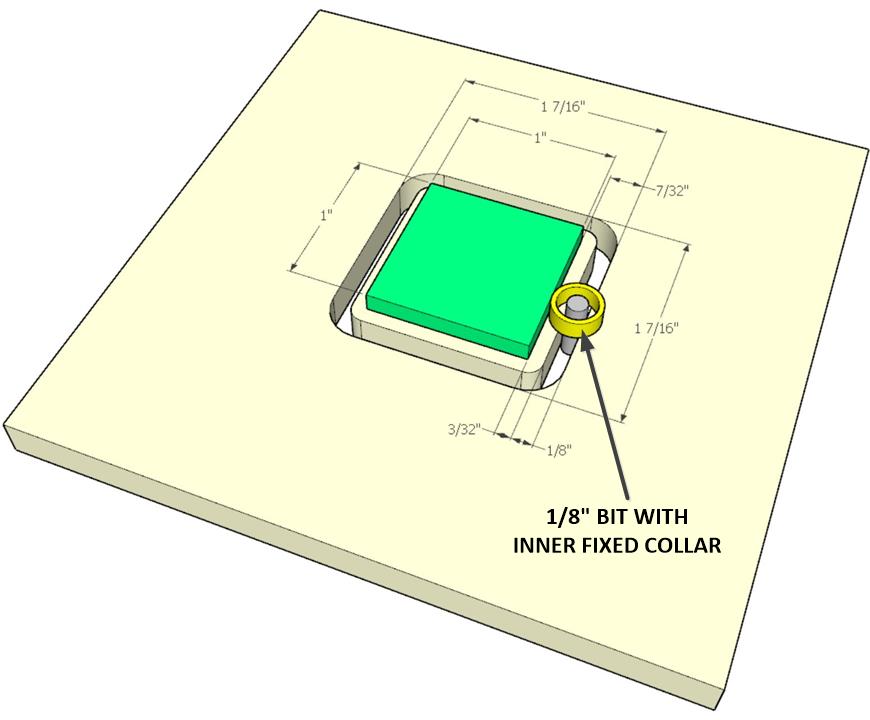
- With the router's base plate resting on the model square, ensure the fixed inner collar of the template guide is resting against the side of the model as shown in the image below.
- Start the router and plunge the bit to full depth.
- Move the bit in a counterclockwise direction all the way around the model square. BE SURE THAT THE COLLAR OF THE TEMPLATE GUIDE REMAINS IN CONTACT WITH THE MODEL SQUARE AT ALL TIMES.
- Turn the router off but do not move the router.
- Once the router bit has come to a complete stop, remove the router.
- Carefully remove the MDF from the sacrificial substrate. Remove any remaining double-sided tape.
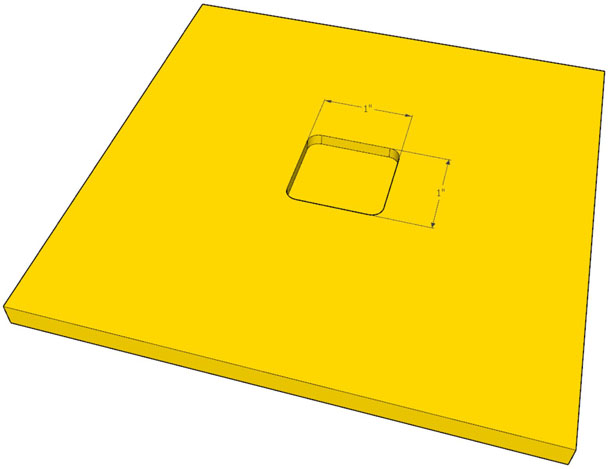
You should now have a piece of MDF with a cutout (mortise) exactly like the one in the image below. Notice that the mortise is 1 7/16" x 1 7/16" and the corners of the mortise are rounded.
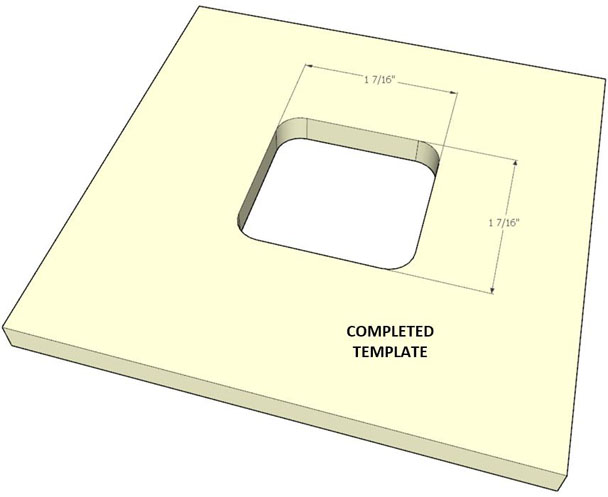
The dimensions of the inlay kit affect the dimensions of the mortise. And, rounded inside corners always occur when doing a router inlay. Notice that the inner edges of the mortise are smooth and straight. Yours should be identical with no bumps, dents, or irregularities.
The Image Above is Important!
If you wanted to create an inlay of a 1" x 1" square inlaid into a surface, you could have started here! You would not have to be bothered with trying to balance your router on a small 1" x 1" starting model.
Instead, you could have begun by creating a 1 7/16" x 1 7/16" square hole or mortise in a piece of MDF. This is often the best way to begin. You simply would have to know that a hole of this size is needed to create a 1" x 1" inlay. Now you know! But be sure that the radius of each inside corner is no larger than 7/32". For example, you could use square corners if that would be convenient.
The use of a template like the one shown in the above image generally means that your router plate has a large, flat, stable surface to rest on.
Using the Template to Create the Inlay Positive
Set Up the Router to Cut the Inlay Positive
- You must use a plunge router. The router's base plate must be able to accept the threaded brass template guide and brass lock nut.
- Install the threaded brass template guide and brass lock nut onto the router's base plate.
- Install the special centering pin in the router's collet and adjust the router's base plate so that the template guide is centered exactly around the centering pin.
- Remove the centering pin and install the 1/8" down-cutting bit in the router's collet. Be sure that the router is set up so that you can make maximum use of the cutting portion of the cutting bit.
- Be sure the removable outer collar has been removed.
Cutting the Inlay Positive
- First, select the material for the inlay positive, that is, the material that will be inserted into the inlay negative. This should be flat material with a color that contrasts with the color of the inlay negative. So, for example, you might use walnut as the inlay positive and maple as the inlay negative. The material should be at least 1/4" thick.
- Use double-sided tape to secure the template on top of the material that you're using for the inlay positive. Keep the tape away from the mortise where the router will cut. The arrangement should look like the image below.
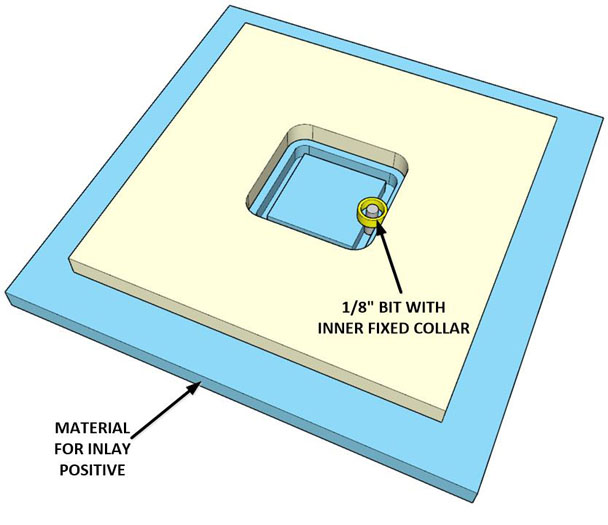
- Set the router's depth of cut so that the bit will cut past the template and more than 1/8" deep into the inlay positive material. I assumed a cutting depth of 3/16" into the positive inlay material.
- Retract the bit.
- Place the router base plate on top of the template with the template guide resting against the side of the template's mortise as shown in the picture above.
- Start the router and plunge the bit to full depth.
- Cut the groove shown in the image by moving the router in a clockwise direction while ensuring that the template guide remains against the side of the mortise in the template.
- Turn the router off once the cut is complete but do not move the router.
- When the router bit comes to a complete stop, remove the router.
- Remove the template from the inlay positive material and remove any remaining tape.
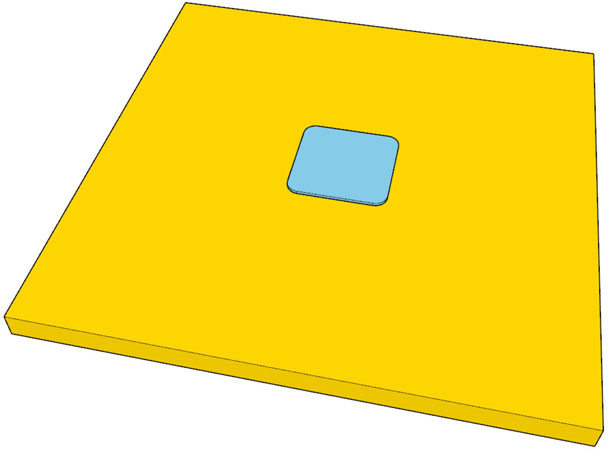
You should be left with the sheet of inlay positive material that looks like the image below.
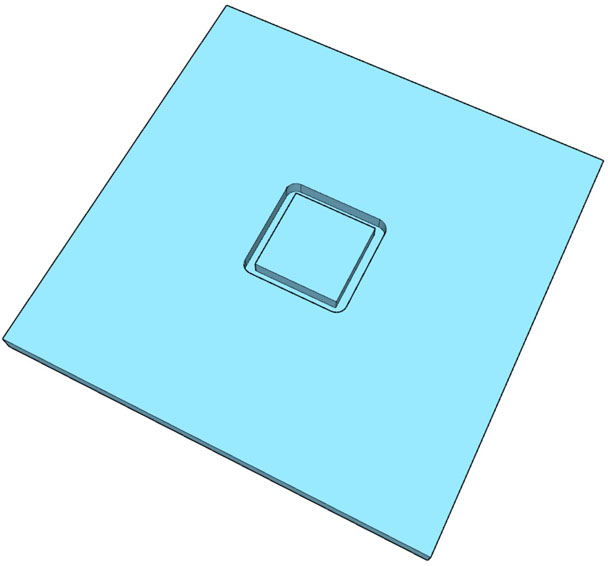
The inlay positive is what's left in the middle of the above image. But it's part of the entire sheet. So, what do you do with it?
Separating the Inlay Positive
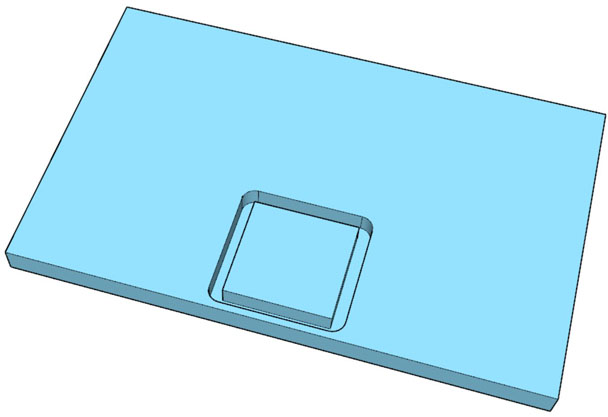
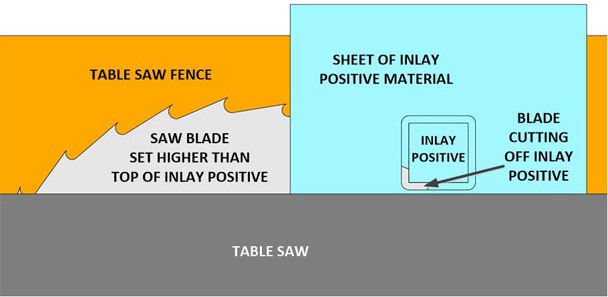
First, use a table saw to cut off nearly all the material on one side of the sheet as shown in the image below.
Now use the following procedure to separate the inlay as illustrated in the images below.
- Be sure the table saw is turned off.
- Ensure that the saw blade is not tilted.
- Set the inlay positive sheet on its edge and against the table saw fence.
- Set the blade height so that the teeth cut higher than the highest point of the inlay.
- Position the fence so that the left side of the blade is set 5/32" in from the left side of the inlay sheet. This will make the inlay 5/32" thick, which is ideal for the purposes of this explanation.
- Turn the table saw on.
- Very carefully pass the sheet along the fence and past the blade. This can be dangerous, so be careful!
- Once the inlay portion of the sheet passes the blade, the inlay should drop onto the top of the table saw.
- Turn the saw off.
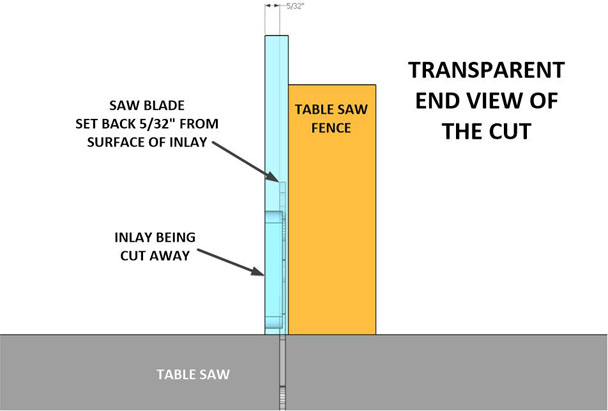
So the inlay has been cut away from the sheet, and you're left with a 1" x 1" square that is 5/32" thick as you see in the figure below.

Using the Template to Create the Inlay Negative
Set Up the Router to Cut the Inlay Negative
- You must use a plunge router. The router's base plate must be able to accept the threaded brass template guide and brass lock nut.
- Install the threaded brass template guide and brass lock nut onto the router's base plate.
- Install the special centering pin in the router's collet and adjust the router's base plate so that the template guide is centered exactly around the centering pin.
- Remove the centering pin and install the 1/8" down-cutting bit in the router's collet. Be sure that the router is set up so that you can make maximum use of the cutting portion of the cutting bit.
- Be sure the removable outer collar is in place around the fixed collar.
Cutting the Inlay Negative
- First, select the material for the inlay negative, that is, the material that will accept the insertion of the inlay positive. This should be material with a color that contrasts with the color of the inlay positive. So, for example, you might use walnut as the inlay positive and maple as the inlay negative. The material should be more than 1/8" thick.
- Use double-sided tape to secure the template on top of the material that you're using for the inlay negative. Keep the tape away from the mortise where the router will cut. The arrangement should look like the image below.
- Set the router's depth of cut so that the bit will cut past the template and exactly 1/8" deep into the inlay negative material. Recall that the inlay positive was cut 5/32" thick, or 1/32" more than 1/8". NOTE: You will want the depth of cut in the inlay negative to be slightly less than the thickness of the inlay positive. It's easier to remove the small amount of the positive's material to make the positive and negative surfaces flush than it is to remove a large amount of the negative's material. Thus, the inlay positive is created before the inlay negative so that you can know how thick the inlay positive needs to be.
- Retract the bit.
- Place the router base plate on top of the template with the template guide removable outer collar resting against the side of the template's mortise as shown in the picture above.
- Start the router and plunge the bit to full depth.
- Cut the groove shown in the image by moving the router in a clockwise direction while ensuring that the template guide remains against the side of the mortise in the template.
- Continue routing and remove all the material from the mortise in the inlay negative.
- Turn the router off once the cut is complete but do not move the router.
- When the router bit comes to a complete stop, remove the router.
- Remove the template from the inlay negative material and remove any remaining tape.
You should be left with the sheet of inlay negative material that looks like the image below.
The inlay negative now has a mortise that's exactly 1" x 1" square. The corners are rounded, of course.
The negative is now ready to receive the positive. But the positive isn't quite ready to be inserted. The corners of the positive must be rounded to account for the rounded corners in the negative. Those corners have a 1/8" radius.
Seating the Inlay Positive into the Inlay Negative
- Use a sanding block to round over each corner to a 1/8" radius by hand. Check the fit occasionally. Be careful not to press the positive into the negative too far because the tight fit might prevent you from removing it.
- Once the fit appears to be good, carefully apply a small amount of glue to the bottom of the inlay negative and the bottom and sides of the positive.
- Carefully and gently place the positive into the negative and press it down gently to be sure the pieces are mating correctly. Then lay a piece of scrap wood on top of the positive and hammer the scrap carefully to ensure that the positive is fully seated in the negative.
Once the glue has been cleaned away, you should have something that looks like the image below.
The Final Touches
- The inlay positive will now sit proud of the surface of the inlay negative by about 1/32" if you followed the procedure to the letter.
- Use a block plane or chisel to remove most of the excess material from the inlay positive.
- Carefully sand the area to ensure that the surfaces of the positive and negative are perfectly flush and flat.
I think you'll agree at this point that it was best to have the positive proud of the negative rather than the other way around.
So What About that Inlay in the Opening Picture?
The opening picture of this page shows a walnut Christian cross inlaid into a piece of curly maple. The template for that inlay was created by hand.
There might be something to be learned by examining the dimensions used to create that template. Here is a picture that allows you to compare the relative dimensions. Notice that the template's corners can be square:
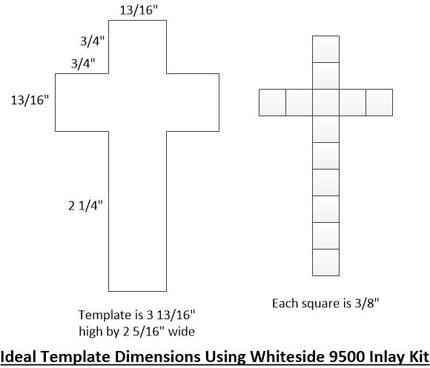
A Summary of the Whiteside 9500 Inlay Kit Dimensions
